Portable Massage Table
Construction Plans
![]()
![]()
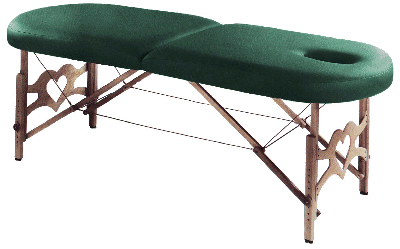
Note: Picture is of a similar design but not exactly this table.
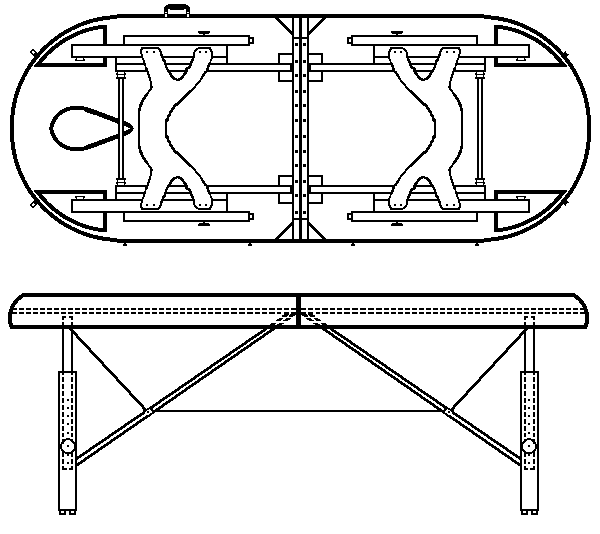
This is a drawing of the table!
Discussion
Summary: The following design was conceived to allow someone with good woodworking knowledge, a full set of tools and clamps, and about $235 to build a very nice light weight, strong, and portable massage table that would be suitable for doing healing treatments and massage. It takes about forty hours of woodworking, finishing, cable making and upholstery, plus parts gathering, to complete.
Many people without the tools, skills or finances for this project sent emails asking for an alternative. I came up with a complicated design involving modifying a standard office table that worked, but was too difficult. During Christmas shopping in 1998 I found a table that can be used as is with only having to cut a face hole. I documented this much better solution on its own Internet page. You can view that solution by clicking here ( http://BillPentz.com/massage/foldingtable.html ).
Goal: As an old engineer, computer nerd, woodworker, Shiatsu Master and new Reiki Master, I had wanted a portable massage table since seeing my first in the early seventies. It had to be friendly and light enough to handle with my arthritis and bad leg, easily adjustable in height so my students could use it, yet solid enough to work on people up to 400 pounds. It also had to be inexpensive as this is my hobby and I have limited funds with a growing family. Although aware that a good quality new portable massage table costs between $400 and $700, my goal was to find a top quality used table in the $200 range. A friend let me use his spare table giving me plenty of time to find my own. I fell in love with that particular table, but in two years of searching was unable to find a used one at a price of $200 or less. Finding no plans for a massage table, I decided to build one myself and share my efforts on the Internet. I tried many portable solutions and began building a design that "borrowed" the best features of each ensuring I used nothing that was patented. I was well on my way to making a comfortable solid light design when my loaner vanished. I found myself needing one immediately. I bought the oval table pictured above from the same firm who had built my older loaner table. I was gravely disappointed. It was very expensive, of lesser quality than its predecessor, and that firm so poorly treated me I can not recommend them at all. Regardless, this just inspired me to hurry up and build the table I really wanted.
Table Type: Not one to want to reinvent the wheel, I researched massage table construction finding many excellent solutions. The choices were incredible. Most of the nicest were stationary tables. One of my favorites was a heavy wooden table that tilted up turning into an oval mirror making a nice solution for a bedroom. There also were some nice light solutions including a sixteen-pound table made from plywood and aluminum and even a twelve-pound table made of graphite fiber. Such fiber and tubes are now readily available and inexpensive enough to be an interesting possibility. Although I have the tools and skills to use aluminum or even graphite fiber, my goal was still to have portability and a design that others could build, so I limited my search to portable wooden framed tables.
Table Design: All of the best tables were very similar to make it comfortable for both the one giving and the one receiving a massage. All were between 28 to 30 inches wide and between 72 to 78 inches long with rounded corners, recessed adjustable height legs, and built in face hole. They all were covered with the new flexible doeskin soft very tough vinyl that can withstand body oils and acids, is easy to clean, and is very easy to work using a standard sewing machine. That vinyl covers 2" to 2 1/2" of foam to make a very comfortable base. The foam is supported on a hinged two-part tabletop that closes to hide the legs and make the table easier to store and carry. They used two piece fitted legs with a single screw height adjustment. All used center support braces with everything held locked firmly in place by strong steel cables that pull tight as the table is set up. This gives more strength with near instant setup and takedown without having to engage any locks, levers, knobs, screws, etc. The best also machined away excess wood on the supports and legs to minimize weight. All used strategically placed padding, plastic washers, and special reinforcement to minimize squeaks and table movement. Elastic pulled the cables out of the way when closing the table. All woodworking was carefully rounded, sanded, and finished to protect surfaces and prevent snags and bumps. These common features help avoid bruises as you work around the table, help avoid aches from having to stretch too far while giving treatments, and make the table stronger and more portable.
Quality: Long ago I learned the feeling of a good deal passes quickly when you have to live with poor quality. I always try to spend the few extra dollars to make something really special that I can enjoy and be proud of for many years. On a massage table there really is so little that the cost to do a significant upgrade is tiny. One of my sad discoveries is that many designs, including the one I bought, cut too many corners. Declining to follow their lead, I upgraded to furniture quality hardwoods with fine solid brass hardware. I threw out the commercial skirt designs with poor joints and staples that will come loose in favor of a single piece laminated plywood arch glued on a thin strong sheet of Baltic birch plywood. This construction takes a little more work but creates a much stronger and lighter solution that will last. A friend of mine who owns an upholstery business said that most lightweight foam only lasts a couple of years and strongly recommended use of the more expensive commercial upholstery foam. The small initial cost increase can save hundreds in replacing foam and upholstery every few years. I also replaced the fancy leg end supports that bang into me when I use a knee pillow with a strong simple arch that I customize with a scroll-sawn name or design. For myself I also added two removable pillows that attach to the inside of the frame with Velcro, one for a bolster or head pillow, and the other a kneepad. I also added a Velcro held 1 �" thick fleece pad, elastic fitted sheet with a sewn in lined face hole, and polar fleece face hole pad to improve comfort. This far better quality only costs a few pounds of weight and a few dollars.
Table Size: Buying standard "off the shelf" materials pretty much defines maximum table size within the above limits. Even part of an inch takes us from using standard materials into far more costly special order items, wasted material, and having to make complex splices, joints, and other compromises. Standard Baltic birch plywood is the strongest lightest affordable wood for the tabletop. It comes in 60" squares limiting the table width to 30" which is a half sheet. That 30" table width is further reinforced as commercial foam comes in 60" by 80" sheets and few firms will sell less than a half sheet. Foam is too expensive to waste and does not join well. Rounded corners pose a little more woodworking challenge and further limit the length of the table. Sawing a standard 1/8" x 48" x 96" (4' x 8') sheet of plywood into the long thin strips needed for bending to make the rounded corners creates 96" long pieces. When bent to create a 30" diameter circular arch for a 30" wide table, these pieces form a side that is just over 38" making a finished table length of 6' 4".
Omissions: There are many clever features that can make a nicer table. There also were many features that took away from overall table life creating something that just would not last. Although most offered an auxiliary face cradle, I did not find any that were that comfortable or looked like they would stay in adjustment. A silly offering was a plug for the built in face holes that makes no sense when you can just turn the person around to keep the face hole out of the way. One other really nice comfort feature that just posed too much of a design and woodworking challenge, was making the table able to both tilt and fit different body positions allowing for adjustments to accommodate breasts, pregnancy, and sore backs.
Preliminaries
Cost: The typical cost to build one of these tables is about $235 depending on where you shop and the quality of foam you choose. One of my students, a real scrounger, was able to build this table for under $50 but figures he spent nearly one hundred hours scrounging. He scrounged most of the hardware from a commercial junkyard, used foam he found in computer packing boxes, and got the wood from a railroad salvage yard. I do not have the time to do that kind of scrounging, so the items used in my table were found at my local Home Depot Warehouse store, Joanne's Cloth World, a cable store, an upholstery supply store, and a specialty wood store.
Skills: This is not a basic woodworking project to be taken on by someone who is not already somewhat skilled. You should have experience with three or four major projects that involve very accurate machining. At the same time, this is not a particularly difficult project if you stay organized and are careful.
Time: Although my first tables took on the order of sixty hours to complete before upholstery, most of that time was spent figuring out how to do things and making jigs. I am now faster, others that have built this table tell me that with my plans it still takes them between forty to sixty hours work plus finding all the parts. Most spend about two hours building each side of the tabletop. The legs take about two hours more to machine. The braces also take a couple of hours to machine. About four to six hours of sanding followed by a couple of hours of finishing completes the woodworking. With drilling jigs to ensure consistency you can drill the holes for the hardware in few hours. The upholstery involves making five seams and only takes about two hours after figuring out how. Building the cables only takes a couple of hours but requires a cable swaging tool if you do not want the table to collapse! Cable measurements are critical. My cable supplier will make them for only $12 extra, but you can not finish the center cables until all is assembled and you can determine the right length. It takes about four hours to assemble the table, install the hardware and finish the center cables.
Helpful Hints: Read these instructions carefully before starting on your table. This Internet page has the benefit of feedback from many who have successfully built these tables trimming the cost, time, and frustration considerably. Pay particular attention to the areas regarding making cables and in cutting your wooden parts. For example, I found it far less trouble to let my wood store cut my laminating strips for the skirt, cut the Baltic birch ply in half for the tops, and cut the hardwood for the legs. They only charge $10 for all of those cuts. Similarly, building a few jigs will save lots of grief. So will having lots of clamps (I use twenty-two to make the rounded end for one table half).
Tools: To make the legs and top you need a set of hand or power tools plus a few specialty tools including: �" and 2" Forstner drill bits, a router, a 1/4" lower bearing round over router bit, a �" lower bearing pattern following router bit for trimming tops, a �" flat bottomed upper bearing pattern following router bit for hinge recesses, glue "J" roller, and at least 8, preferably 16 clamps. A table saw, scroll saw, and chop saw all help to speed up the construction, but none of these are essential. All of the hardware can be installed with hand tools but you do need to cut four threads with a 1/4" 20 drill and tap. For the upholstery you need good and rough scissors, razor knife, single edged razor blades, electric carving knife, sewing machine capable of sewing light weight vinyl, and a heavy duty staple gun. A router table is a big plus and makes the wood working safer and easier.
Materials List:
Qty Description
Upholstery
"Doeskin" Soft vinyl covering 3 yards x 54" stretchable in all directions
2 Light-density upholstery foam 2" x 31" x 39"
2 �" Carpet pad or Insulite pad 31" x 39"
2 pieces of �" carpet or Insulite padding 2" x 96" to cover skirt sides.
2 pieces of 1" lightweight foam 5" x 96" to wrap over table sides
1 Elastic Cord 3/16" x 30" to pull in cables during folding
1 Tack strip �" x 30' to hide vinyl edges (stick on plastic window insulation works well)
Hardware
1 Felt strip (self adhesive) 1/8" x 3/4" x 12" for cushioning leg tops, and sides
1 Hinge 1.75" x 24" for connecting table halves
4 Hinges, 3" tapered strap hinge for mounting legs to table
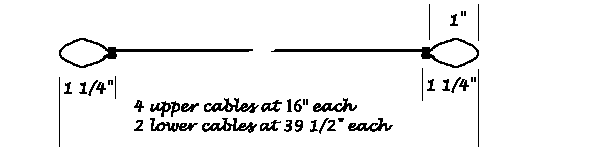
4 Cables, 3/16" wire rope vinyl coated 16" long
2 Cables 3/16" wire rope vinyl coated 44" long
12 Cable ferule ends for making cable loops (Get spares and practice first)
4 Cable races 3/4" x 1/4" with 1/4" hole ID Upper cable support
4 Cable dual-races 3/4" x 1/2" with 1/4" hole ID lower dual cable support
8 Tips, 3/4" Rubber Screw in for Leg bottoms
4 Bolts 2" x 1/4" 20 with 1/2" unthreaded at head for Cable mounts
4 Bolts, hex head 3 1/2" x 1/4" 20 with 2" unthreaded for center cable mounts
or
4 High density plastic 3 1/2" x 3/8" dowels (more quiet operation of center support)
4 Bolts, 3 1/2" x 1/4" 20 with 2" unthreaded top support
4 Bolts, Round head 2 1/4" x 1/4" 20 (Epoxy in for Leg extensions)
24 Screws, brass plated hinge #8 x 1"
32 Screws, Brass #6 5/8" (for leg hinges)
16 Screws, Brass #6 5/8" (for leg face supports)
8 Nuts, Aircraft non slip 1/4" 20 (Top leg cable mount & top support mount)
4 Nuts, 1/4" 20 (for wooden wheel leg tensioning)
24 Washers, Nylon or high density plastic
4 Leg risers 5/16" x 1.5" used to protect the table sides.
1 Carrying Handle
2 Draw catches, Brass 2 3/4" x 1 1/2" with screws (holds table closed)
2 Aluminum rod 3/8" x 14 3/8" both ends with 1/4" x 20 threads to hold braces
Wood
1 Wood Ply, Baltic Birch 6 mm 60" square
2 Wood Ply end pieces 24" x 12" x 6 mm (or 1/4")
4 Wood Ply under leg supports 6 mm (or 1/4") x 4 3/4" x 8 1/2"
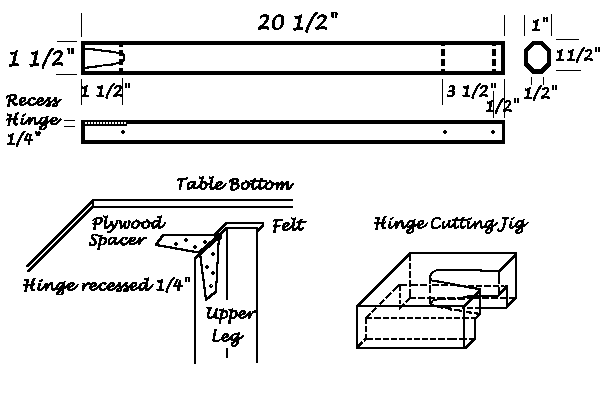
4 Wood leg, alder upper finished size of 20 1/2" x 1 1/2" x 1"
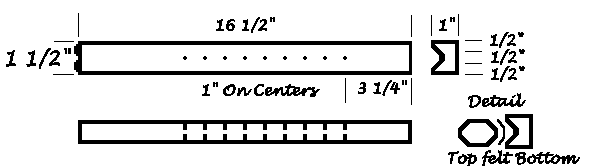
4 Wood leg, alder lower finished size of 16 1/2" x 1 1/2" x 1"
4 Wood Center Brace, HR maple top piece 23" x 1" x 3/4" (with groove - see drawing)
4 Wood Center Brace, HR maple bottom piece 14 5/8" x 1" x 3/4" (with groove - see drawing)
14 Oak Plywood Laminating strips to make sides, 96" x 1/8" x 2" (7 strips each side)
2 Wood End Strip, alder 7/8" x 1 3/4" x 28 1/8" (table skirt end pieces for hinges)
4 Knobs with 1/4" 20 threads (or 1 1/2" round wooden wheels with threaded nuts Epoxy in)
1 Wood Ply, 3/4" 48" x 48" for forms/templates
Supplies
Wood glue, 16 oz. (Tightbond III recommended)
Waxed paper
1 Can of upholstery foam spray adhesive
Plastic drop cloth
Clear plastic 2" package sealing tape
Small Tube of Silicon grease
Construction General:
Building this table is broken down into four parts. First, build the tabletops. Second, build and finish the legs and supports. Third, upholster the tabletops. And finally assemble the table and mount the hardware.
Finishing: All exposed wooden edges are rounded over with a router then all wooden parts are sanded to 220-grit sandpaper optionally followed by 400 grit. Do not do any finishing until all gluing and machining is done. Although lots of different finishes have been tried, the easiest and best lasting appears to be a tough polyurethane wiping oil. Apply two coats to all exposed wooden parts except the tabletops prior to final assembly and upholstery.
Construction Detail:
Upper Legs: Cut the leg tops 1/16" oversize for length, width, and height. This lets you sand off the saw marks to the correct finished size. Cut the hinge recesses using a jig and pattern following router bit exactly 1/4" deep. The recess stabilizes the hinge and is needed to let the table leg lie down flat enough to close the table! Preferably using a router table cut the 45-degree bevels on each side without cutting into the top 3" of each leg. Although you only need to cut these 45-degree bevels on the one side that will mate with the lower legs, cutting both sides lets any leg be used in any position and the legs are a little more pleasing in appearance. Next, drill all of the holes using a countersink and template to make a nicer finished and more consistent product. Drill holes for the upper cable, the hidden leg stay peg (optional), and the leg bolt. Drill a tight flush fit for the round leg bolt head. Epoxy in the leg stay peg and round leg bolt before finishing to make sure of a good bond. Mount a hinge on the top of each leg. Apply felt on the top of the leg where it will touch the bottom of the table and on the bottom edge where it will meet with the lower leg piece.
Lower Legs: Again carefully size 1/16" over for length, width, and height. Next, using a jig and preferably a drill press, drill the nine 1" apart �" bolt holes drilling from front to the back using a tightly clamped backer board to minimize tear out. Next cut the bevel slots to match the top leg piece. It is safer to do this with several passes with a �" router bit followed by multiple passes of a 45 degree bit. You could also do these cuts on a table saw. This fit keeps the leg strong and stable, so considerable care should be taken to ensure a good fit with the upper legs. Sand and apply your finish. After the finish has dried hard, screw in two 5/8" rubber bumpers equally spaced into the bottom of each leg. Now apply felt to the top of the lower leg where it will mate with the upper leg. This felt will help keep the table from squeaking.
Center Supports: There are four upper and four lower table center supports. Only a very strong wood such as hard rock maple should be used for these parts. All are made the same way. First size 1/16" over for length, width, and height. If weight is critical you can use a jig with your router to cut a 1/2" wide and 1/2" deep rounded groove on the upper and lower faces stopping the groove 1" from each end. Remember to make multiple light passes, as these are very small pieces. Next, use a brad point bit to drill the upper and lower holes using backer boards and a jig to ensure all holes match. After drilling the fist hole, slip a dowel into the hole into the jig board and the support part to make sure all other holes remain identical in spacing. If you want the quietest table possible, put in high-density plastic sleeves that will fit snugly on the unthreaded portion of a �" bolt shaft and carefully lubricate each hole with silicon grease.
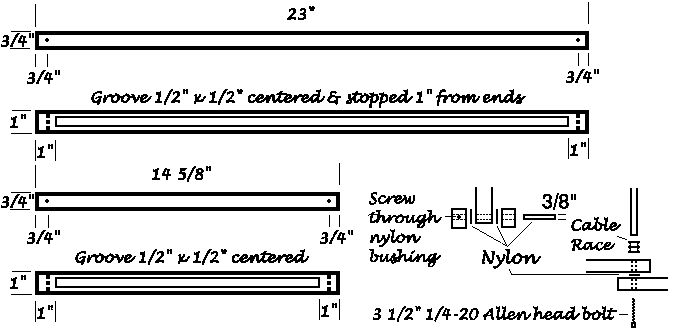
Cables: The six cables used in this table make up the many triangles that keep this table strong. Using the wrong type of cable, the wrong kind of cable ends known as ferules, or even the wrong tool to crimp those ends will make weak cables. Of the many different kinds of cables (called wire rope), 3/32" cable coated with an extra layer of vinyl to protect the woodwork works best for me. You can use either stainless steel or not, but it is important that you have a high wire count for ample flexibility and at least that thickness for the proper strength. You can make up all four top cables in advance, but should hold off on completing the bottom cables until final assembly, as there are too many variables to know the exact final length in advance. Holding off on making these lower cables will fix any tiny variances and leave the result with just the right tension. To size these cables I turn the table upside down and set the cable length to hold one end flat and the other just �" off a flat floor then build the other cable to the same length.
Putting the loops on cable is not difficult, but you must have the right parts, tools, and know how if you do not want the cables to fail. I learned the hard way when my daughter jumped on a table and it collapsed because a cable end let loose! Almost every part used in cable making is non-standard, so you have to measure carefully. Cable dents regular wire cutters so to cut it you need a special cutter or a cutoff disk in a rotary tool. After stripping off 3 �" of vinyl coating pass one end of the cable through a ferule which is a little oval metal figure 8 shaped tube, around the cable race, then back through the other half of the ferule (easier said than done as this stuff is springy). Don't forget the race because the cable will be too tight to put it on later! You must use plated copper ferules as the aluminum ferules carried by most hardware stores are too light and will slip when weight is put on your table, so don't use Aluminum ferules! Tinned copper ferrules are available from cable supply stores (check out boat or marine stores if you can not find a cable shop). Making the crimp on the ferule just right requires a special tool known as a swaging tool. A good swaging tool costs about $90 or more, but without it your cables will slip. Fortunately, most local cable suppliers will let you use their swaging tool for free at their facility, if your buy cables and ferules from them.
Races: There is a cable race at the top of each leg and a double race mounted on the ends of the support bar that goes between the center support brackets. You can make your own or buy them mail order. I machined my first ones from 3/4" aluminum, but found that took a long time and those wore too much. I switched over to just using steel washers and spacers that I found at a hardware store.
Support Bars: You have to drill and tap with a 1/4"-20 thread into each end of your aluminum support bars that go between the center support brackets. I thread each rod onto a bolt chucked in my drill press and use sandpaper to make a nice brushed aluminum finish.
![]()
Table Sides & Top: The table tops come from a single piece of 60" square 6 mm Baltic birch plywood which is about 1/4" thick. Less thick wood has just not worked out for others. I let my lumberyard rip that sheet in half making it easier to handle. After ripping, each half ends up being 29 15/16" wide or about 1/16" less than the finished width. We make up the difference by rounding over the edge with a router. This leaves no room for error, so that cut must be centered! At first I carefully precut the tops and spent a lot of time to get all to fit. This caused too many problems. I now simply glue the laminations directly to the tabletop. After the glue is dry then trim off the excess (used later to make the leg arches and leg pads).
To provide ample flexibility for bending, a consistent width, and plenty of strength I make the skirt from glued together strips of 1/8" oak plywood. These laminations have to be even in width if you are going to be successful in building a nice even arch and have a good glue joint with the tabletop. Each side takes seven 96" long 1/8" thick pieces carefully sized at 1 13/16" wide which after sanding finishes to be exactly 1 3/4" wide. I found cutting a 4' x 8' piece of flexible plywood on my table saw too awkward for good accuracy, so now just let my lumberyard make those cuts and the results are near perfect.
The skirt glue-up process can be a nightmare if not properly organized, as your glue will dry before you are done. The key to making this process controllable is proper preparation and having a gluing frame. The gluing frame is a jig that sets on the tabletop and provides the pattern to bend the laminations around. Make it from a piece of 3/4" plywood raised on wooden blocks so its edge is centered on the laminations. The gluing frame width is 28 �" which is the 30" table width less the two 7/8" laminated sides. The length is 36 �" which is half the 6' 4" table length minus a 7/8" arch and 7/8" hinge mount. I cut the arch with a circle-cutting jig using my router. The center is 14 1/8" down and I double check by ensuring the cutter just touches both sides of the table before starting. This resulting curve is critical to make for consistent smooth laminations. Cut 2" clamping circles one inch in from the sides starting at the center evenly spaced all around including the base. Put 2" wide tape all around the edge of this frame leaving an overlap both top and bottom to keep any spilled or overrun glue from sticking to the frame. I put centerline at the peak of the arch so I know where to start my lamination strips. Just as an aside, in my original model I cut circles in the two square corners to let me dovetail the end pieces to the sides under the tabletop. This dovetailing was a lot of work that was hidden and unnecessary. Ample strength can be added by gluing and using two 3" deck screws tying each lamination corner to the hinge board.
You need to do some preparation before starting to glue. There is so much to glue that you have to move quickly or your glue will setup before you are done ruining your efforts. To give you more time and because the glue serves as the lubricant to let the strips slide against each other in the bending process you also need to use lots of glue. With lots of glue and working quickly this process is messy with lots of squeeze out. I carefully prepare putting masking tape on all the unglued surfaces. Mask the tabletop by taping inside a line traced onto your tabletop from your glue frame. Mask the oak faces of two laminating strips to serve as the inner and outer edges of your table skirt. Make sure you trim off any extra tape so it does not interfere with gluing the top to the skirt. Mark the centers on the lamination pieces. I also put a large drop cloth under the project, lay out all of the laminating strips on that drop cloth, and keep a wet rag handy. Use of a glue squeeze bottle helps (I use an old plastic mustard jar.)
Start your laminations by putting a taped lamination strip down, thickly coating the upper surface and the surface of one other strip, use a glue roller to roll the glue consistently onto both surfaces then put them together. Repeat this process quickly making sure the masked oak face of the last piece is out to make the inside edge of your table.
Before the lamination glue sets quickly put a coat of glue all around the edge of the tabletop, the ends of the hinge piece, and on the bottom of your stack. Pick up the stack of laminations and center it on the center of the gluing frame. Use a clamp to pull the stack flat against the tabletop then a tight C-clamp to pull your laminations tight to the gluing frame. I find that using hand squeeze clamps for the vertical and padded screw clamps for bending/pulling the lamination works best for me. Repeat this process working your way moving from the center of that arch out carefully using the clamps to pull the laminations flat to the table and tight to the gluing frame arch. I then use two heavy long 3" predrilled and countersunk tapered deck screws on each side to tightly hold the sides to the end piece. Glue in the corner blocks. When you are done, there will be staggered stair step ends after this glue up hanging past your end piece on both sides. Just let them be until the glue is dry. After the glue has set but before it gets hard, remove the clamps, your gluing frame, and masking tape.
After all is dry, flip the top right side up. Trim the staggered lamination strips off leaving them a little proud (about 1/16" oversized). I now first rough cut the table top arch with a saber saw to about �" oversize. Use a lower bearing pattern following bit to trim off the end pieces and to size the top to exactly match the frame. You can also use the frame as a pattern with this same bit to cut the face hole. Now using a �" rounding over bit with bearing, round over the tabletop edge, the edges of the table skirt and hinge end piece, and the corners of the table. Glue a quarter round leg hinge support platform on each side of the arch. This only builds one half, so repeat this process once more for the other side.
Upholstery & Padding:
Vinyl: Key to working with vinyl is having the right material. The old style heavy duty vinyl used for restaurant upholstery is just too thick to work without commercial equipment and the really light table cloth stuff is too thin to last. Also, many of these products have a backing that only allows the vinyl to be stretched in one direction making for at best a sloppy job trying to stretch around the table arch. At first I used heavy upholstery vinyl and really had to fight it using a heat gun. That problem went away after going to the more expensive doe skin vinyl.
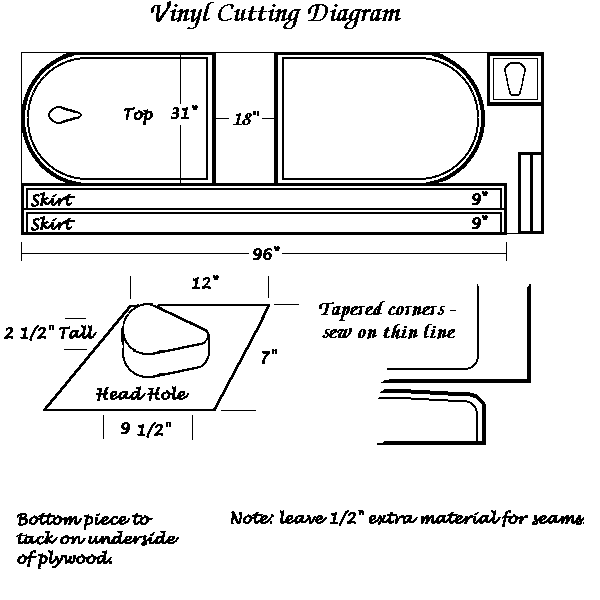
Vinyl Layout: After some sanding cleanup, before applying padding you need to use the tabletops as patterns to cut and sew you vinyl for an exact fit. Lay your three yards of vinyl good side down. Put both tabletops on that vinyl hinge sides touching. Leave �" extra all around the skirt (laminated sides only) and 18" between the hinge sides for the vinyl that will wrap from the top to cover the sides where the hinges mount. Careful! This is the only orientation that ensures you have enough material needed to cut the long side coverings! Use a marker on the vinyl backing to trace right next to the table skirt and the face hole to make your sewing and folding lines. Then make your marker 1/2" thicker (masking tape, spacer, etc.) and again trace around your table skirt as well as the face hole to make the cutting line. Don't forget to leave 9" extra material for each side as there are no seams at the center of the table as the vinyl top just goes from the top to wrap down the side! Now cut two 10" by 97" strips for the sides. Wrap those strips around the table skirt and carefully mark the skirt ends as a reference for the sewing and final cutting lines.
Padding: Be careful on the quality of foam you use in your table. Common lightweight foam is only designed to last a couple of years. Sadly, many commercial tables use this type of foam because it is less expensive. Using light upholstery foam will add a couple of pounds, but more than doubles the life of the foam in your table. Alternatively, if your table is going to receive heavy use, you should use medium weight upholstery foam. It will add about five pounds to the weight of your table overall, but will make it last for years and years.
Pad Installation: After many frustrations I found a process that works well for me. I use Hi-Tack foam spray adhesive to glue down a 1/2" piece of Insulite foam onto each top and the skirt but not the center hinge areas. I then use an old electric carving knife holding it vertical to trim dead even flush with the sides all the way around the frames. I use a spacer to then cut the face hole and the sides off to leave �" of that foam overhanging. The overlapped high-density foam protects from getting bruised by the wood. I next use that same spray adhesive to glue on 2" thick piece of light upholstery foam leaving about an inch of overhang all the way around. Trim the top even with the sides with an electric carving knife held vertical and guided by the table skirt. Be steady and careful as any jagged cuts show and can be felt through the vinyl, particularly on the face hole. I then cut out the face hole leaving a 1" overhang for extra padding. Finally I lay the side top down and glue a 1" thick piece of lightweight foam all around the skirt perimeter except for the ends where the hinges mount. This leaves the top and sides flush only having to carefully trim the bottom with a 3/4" overlap to be rolled over with the vinyl to provide more cushion.
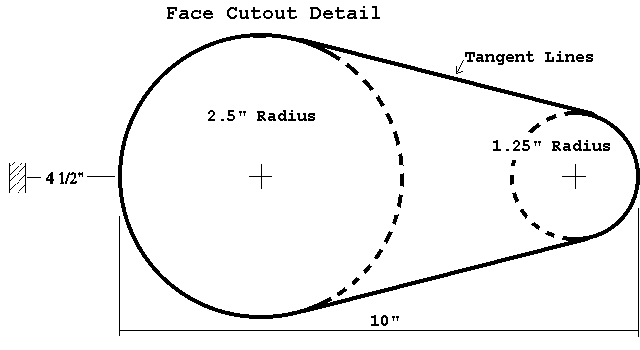
Vinyl Cut Out: Measure twice and cut once! Having marked your pattern from the table top all that is needed is to finish marking the ends opposite the arch and putting in a little taper and some curves to make the vinyl lay better. You saved a seam by leaving extra material on the end to fold under. The length of this end is the width of the sewing seam, plus foam thickness, plus skirt length, plus skirt thickness, plus enough material to go back up the inside of the skirt. For 2" foam this computes to about 9" (2" pad + 3" skirt + �" width + 2 �" skirt). Mark an identical face hole on a 12" x 12" vinyl piece for the bottom of the face hole. You also need to cut a strip long enough to go around the face hole which would be 3 3/4" wide if you use �" seams, 2" foam, and a �" table top. Go ahead and cut out your vinyl.
Sewing Face Hole: Carefully measure the inside length of the face hole and sew the ends of the 3" wide strip to make a loop just the same size. Locate the 1/2" seam from the loop you just created in the center of the chin area (narrow) part of the opening. Sew that 3" wide strip carefully 1/2" in around the face hole in the 12" x 10" piece. Now sew the other side of that 3" strip to the cover. Make sure all seams are inside touching the padding.
Sewing Table Covers: The two sides of the table are covered almost identically, except for one has the face hole. Start sewing the skirt around the outside of each table cover with a 1/2" overlap in one of the square corners. Next build a pocket for the hinge edge of the table. Then pull the skirt down over the rounded part of the table and just lightly temporarily tack into place. Carefully install the face hole and either glue, staple or tack the edge in place on the bottom of the table. I prefer to use a thin bead of hot melt glue and then staples that are not too long! Cover this edge with a nice square made up of tack strip. Having your face hole material about 1/2" undersized will give it a pull that you can use to judge how tight to pull the rest of the upholstery. Carefully warm and tack the rounded section in place working one side then the other from the center out. Trim the remaining vinyl the thickness of your razor knife from the inside edge of the top of the table. Install your cable keeper elastic band.
Table Assembly:
First center, pre-drill for your hinge mounting screws, and mount the 2" x 24" center support hinge. Next, install the center supports with their bolts using a nylon (or high-density plastic) washer on each side of the support. Extend the table supports temporarily using masking tape and splints to keep the support arms straight. Use a right angle square to locate exactly where to put the leg hinges, then screw each hinge into place on one half the table.
Put all six cables on the cable races running the two longer center cables through the elastic keeper. Next, mount the double races at each end of the spacer rods, then bolt first through the short support arm, then through the long support arm and into the spacer rod. With the table upside down, you will have to elevate one end of the table because the cable lengths are just sized to make for a little tension when the table is placed upright. Attach the cables to the upper cable races. Mount the lower leg pieces starting with the fourth hole from the bottom. Determine the balance point for the folded table (about 19" from the hinge end) and install the table handle. Install the table closing locks as shown. Finally, apply the 1" tack strip to finish the whole inside edge as well as the face rectangle. Use and enjoy!
Diagrams:
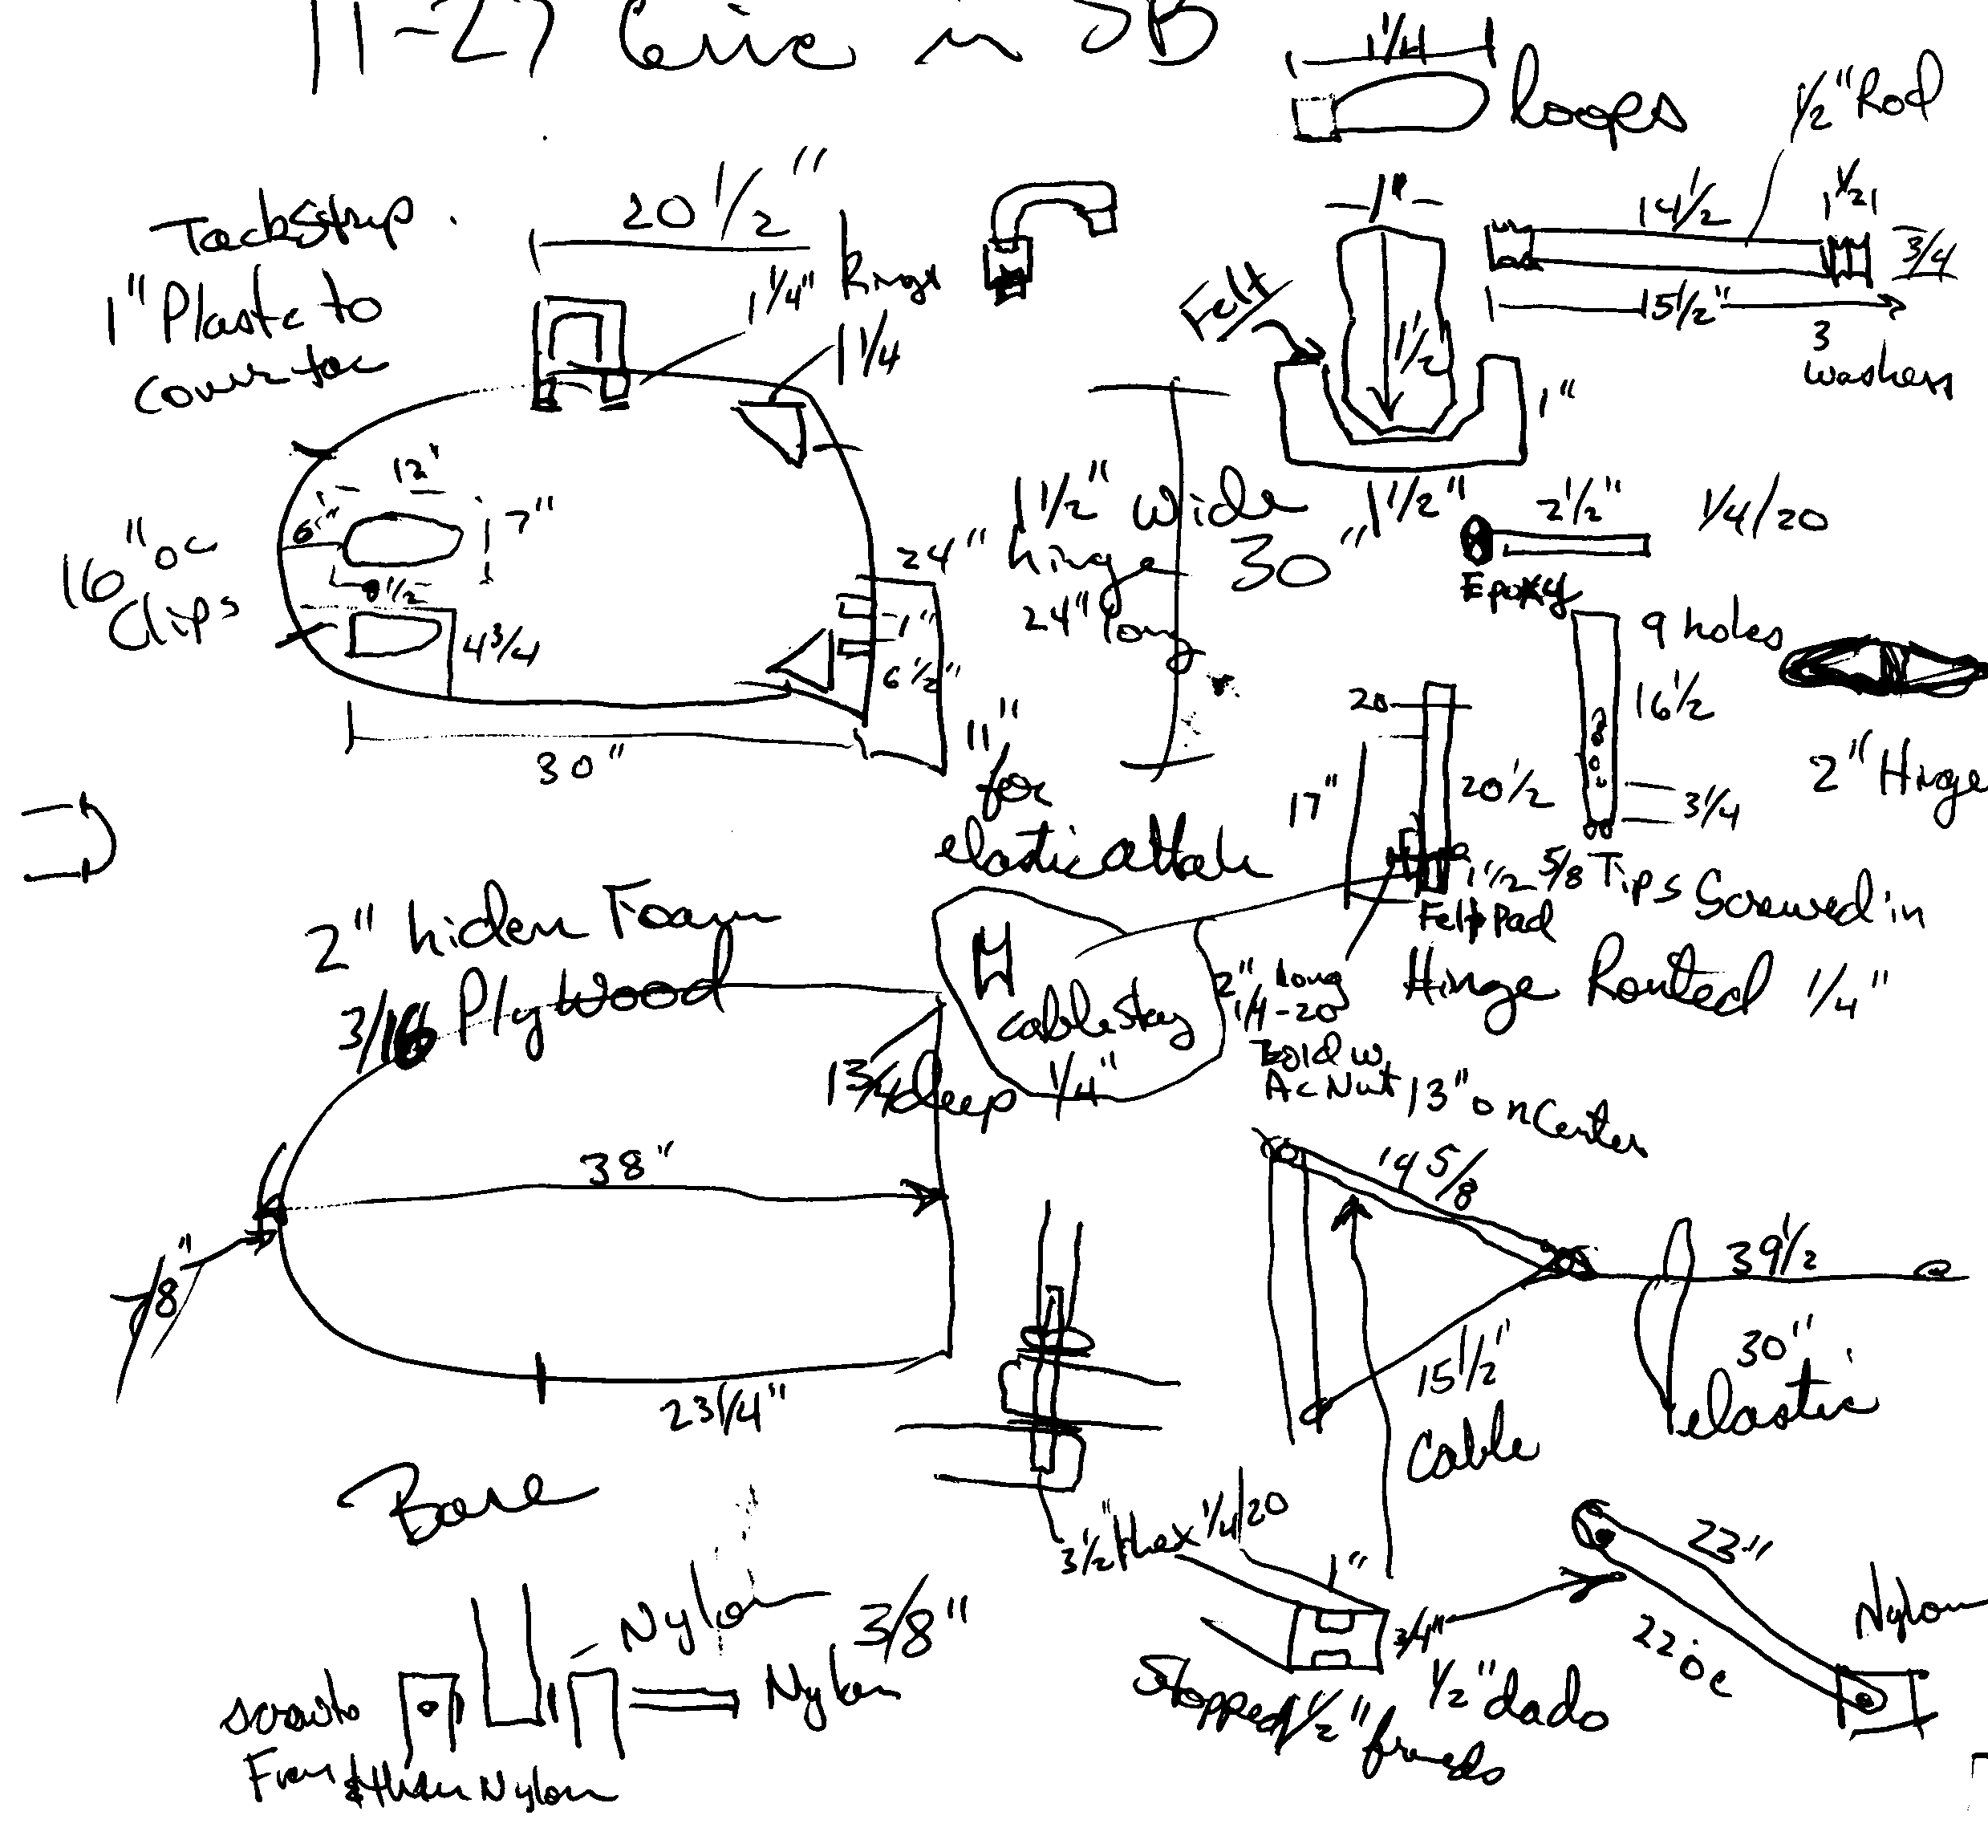
And just for a giggle, my original notes and sketch:
This is one of my efforts to assist others. I do claim copyright © on it and ask that you get my permission before copying or using it. If you are unable to print from here, printed plans are available for $5 shipping and handling.
Click HERE to vote for this page as a Starting Point Hot Site.
Credits:

